plot command uses the same syntax as in the original Berkeley version of Spice.
Since version 2.01 plots with multiple scales can be created:
plot v1 v2 vs vscl1 v3 v4 vs vscl2 v5 v6
The above plot command would display vectors v1 and v2 against vscl1, v3 and v4 against vscl2 and v5 and v6 against the default plot scale. In case vs options are ommited, the vectors are plotted against the default scale of the active plot. Colors for the plot window can be set by setting colorn variables. Example:
set color0 = r255g255b255
... set background color to white
set color1 = r000g000b000
... set grid and text color to black
set color2 = r000g255b000
... set the first vector color to green
set color3 = r255g000b000
... set the second vector color to red
plot v(1) v(2)
... the result is graph with the white background and black grid; 'v(1)' is green and 'v(2)' is red
unset color2
... unset the first vector color; the default will be used; also 'color3' variable will be ignored now
Default plot type can be set using the plottype variable. Available types are: normal, point and comb.
set plottype = normal
Default line width can be 0, 1 or 2. Set it with:
set linewidth = 1
Default plot window width and height in pixels:
set plotwinwidth = 360
set plotwinheight = 360
If you want to show the info frame (coordinates) in plot windows use:
set plotwininfo
Default vector identification mode is now manual identification. Manual identification can be initiated by right-clicking in the plot window. To make automatic identification the default (as in version 2.0 and below), enter:
set plotautoident
Note that all of these settings are valid only for plot windows opened after these setting have been chosen by the appropriate set/unset commands.
The spec command to generate a Fourier transform vector was added.
Written by Anthony Parker, Macquarie University.
General Form
spec start_frequency stop_frequency frequency_step vector
Calculates a new vector containing the Fourier transform of the input vector. This vector should be the output of a transient analysis. This command takes note of the following shell variables which can be set using the set command:
| Variable | Type | Description |
|---|---|---|
| specwindow | String | Specifies the windowing function. Possible values are: none hanning or cosine rectangular hamming triangle or bartlet blackman gaussian If this variable is not defined, the hanning window is used. |
| specwindoworder | Number | Specifies the window order for the gaussian window only. |
Note that the time axis of the input vector should be linearised first by using the linearize command because Spice does not produce a linear time axis for transient analyses. After using the spec command, the spectrum can be displayed by plotting the magnitude of the resultant vector. For instance, after a transient analysis resulting in transient vector v(1), the spectrum can be plotted with the following commands:
linearize 1us
spec 10Hz 100kHz 5kHz v(1)
plot mag(v(1))
DC analysis syntax in one dimension is now:
dc [middle middle_val] parameter1 start1 stop1 [dec|oct|lin] step1
and in two dimensions:
dc parameter1 start1 stop1 [dec|oct|lin] step1
[parameter2 start2 stop2 [dec|oct|lin] step2]
Middle value works only in one dimensional dc sweep, in two dimensional sweep it is ignored. If middle_val is given and it is between start1 and stop1 then dc analysis is performed in two steps. First dc analysis from middle_val to start1 is performed in backward direction. Then dc analysis from middle_val to stop1 is performed. The results are concatenated together. This approach is useful if the nodesets for the middle_val are given. In this case the speed and convergence are better. Parameter can be specified in the following manner. Instance parameters:
@inst[param]
... example is '@r1[resistance]'
@inst
... '@r1' would mean r1 default parameter (resistance)
inst
... 'r1' would mean r1 resistance, 'v1' would mean v1 dc voltage
@inst[param][i]
... i-th component of vector parameter param of instance inst. Model parameters:
@@mod[param]
... example is '@@rm[tc1]' ... tc1 parameter for model rm
@@mod
... '@@rm' would mean default parameter for model rm (in case rm is a resistance model this would be rsh)
@@mod[param][i]
... i-th component of vector parameter param of model mod. Temperatures:
@@@temp
... circuit global temperature in degrees celsius
@@@tnom
... global nominal temperature in degrees celsius for instance and model parameter recalculation
@@@tempk
... circuit global temperature in Kelvins
@@@tnomk
... global nominal temperature in Kelvins for instance and model parameter recalculation. In case dec/oct/lin is ommited, step is the linear step size. In case dec/oct is used, step is the number of points per decade/octave. In case lin is used, step is the number of points in range between start and stop (for 10, 11 points are evaluated including start and stop point). Examples:
dc @r1[resistance] 1m 1meg dec 10
... sweep resistance for instance r1 from 1m to 1meg, 10 points per decade
dc @@rm[rsh] 50 90 lin 100
... sweep rsh for model rm from 50 to 90 with 100 equidistant steps
dc @@@temp -20 50 0.01
... sweep global temperature from -20 to 50 (degrees celsius), step is 0.01
Left hand side can now be specified using the following syntax:
let plot.vector[index1]...[indexn] = expression
Examples:
let dc2.a[3] = 5
... vector a in plot dc2, assign 5 to 4th e lement
let dc2.a = vector(5)
... assign a vector with elements 0..4 to vector 'a' in plot 'dc2' An arbitrary expression can be used for index. If plot name is ommited, the referenced vector is created or modified in current plot. Instance/model parameters can be altered using the let command:
let @r1[resistance] = 5000
... set parameter resistance for instance 'r1' to 5000
let @@rm[tc1] = 0.05
... set model parameter 'tc1' for model 'rm' to 0.05. The syntax for parameters is the same as with the dc analysis. Index into a vector parameter can be an arbitrary expression:
let @v1[coeffs][2*1] = 0.01
... set 3rd element of parameter 'coeffs' for instance 'v1' to 0.01. In special case of assigning vector to a scalar (one component of another vector) vector will be assigned to subsequent indices from the specified element. The vector on the left hand side will not be resized. For instance:
let a = vector(5)
... assign a = (0; 1; 2; 3; 4)
let b = vector(2)
... assign b = (0; 1)
let a[2] = b
... assign a = (0; 1; 0; 1; 4)
let b = vector(6)
... assign b = (0; 1; 2; 3; 4; 5)
let a[1] = b
... assign a = (0; 0; 1; 2; 3) To construct a vector from its components
let a=(10;20;30)
let b=(12;22;32;a;a*2;90)
b would now be a vector with the following elements: 12 22 32 10 20 30 20 40 60 90.
Extended syntax for subcircuit instances.
A particular device parameter in all instances of a specified subcircuit type can be accessed by the following syntax:
@inst:@subckt[param]
Examples. Loaded circuit netlist is:
...
x1 ... amp ...
x2 ... amp ...
...
.subckt amp ...
...
m1 ... w= ...
...
.ends
...
Command explanations:
let @m1:@amp[w] = 1u
... set width parameter of transistor m1 to 1um in all instances of subcircuit amp (@m1:x1[w] = @m1:x2[w] = 1um)
let a = @m1:@amp[w]
... assign scalar a to width parameter of the m1 transistor in the first instance of subcircuit amp (a = @m1:x1[w])
Extended syntax for vectors in expressions.
The extended syntax for vectors in expressions now is:
let c=dc1.a*2
... take vector a in plot dc1 and mutiply it by 2, assign the result to vector c in current plot
let c=dc1.a[2]*2
... vector a in plot dc1, take 3rd element, mutiply by 2 and assign the result to vector c in current plot
let c=a[2][3]*2
... a is a 2D vector, indices into this vector are 2 and 3. Another example:
let c=@r1[p][3]
... This will take the 4th element from vector @r1[p]. Assigning into a vector element for an instance/model parameter:
let @r1[p][3]=0.05
Of course such vectors can be referenced in other plots too:
let a=dc1.@r1[p]
Note again the use of braces in the above example when accessing a vector element:
let a=(dc1.@r1[p])[3]
Instance/model parameters can be used in expressions. Some examples:
let c=@r1[resistance]
let c=@@rm[tc1]
let c=@v1[coeffs]
... assign coeffs vector parameter value of instance v1 to c
let c=@v1[coeffs][2*1]
... assign coeffs vector parameter's 3rd element (from instance v1) to vector c
Functions min() and max() return the smallest/largest component of a vector. For complex vectors the smallest/largest component is determined by comparing the absolute value of the components. Function sum() returns the sum of the components of a vector. Examples:
* Real vector
let a=(1;2;3;4)
* Complex vector
let b=((0,-1);(2,1);(0,0))
* min() example
* c <- 1
let c=min(a)
* c <- (0,0)
let c=min(b)
* max() example
* c <- 4
let c=max(a)
* c <- (2,1)
let c=max(b)
* sum() example
* c <- 10
let c=sum(a)
* c <- (2,0)
let c=sum(b)
Netlist parsing completely rewritten.
Improved error reporting. Added .lib clause. Example: File lib1.lib:
.lib section1
r1 1 2 1
r2 2 3 1
.endl
.lib section2
r1 1 0 1
r2 3 0 1
.endl
File netlist:
Test netlist
* Include section1 from lib1.lib
.lib 'lib1.lib' section1
* Include section2 from lib1.lib
.lib 'lib1.lib' section2
.end
To create a plot and name it use setplot new and then nameplot.
The first vector you create in that plot becomes the default scale.
setplot new
nameplot plot10
let a=(2;4;5;9)
let b=(1;2;3;4)
* a is the default scale for plot10
Vector operator [|low,high] selects a range from a vector that corresponds to the range low <= default_scale_value <= high on the default scale. Example:
setplot new
nameplot plot10
let a=(2;4;5;9)
let b=(1;2;3;4)
* Select values for b for which the scale value is
* between 2.5 and 5.5
let x1=b[|2.5,5.5]
* Select values for b for which the scale value is
* between 4 and 5
let x2=b[|4,5]
* Both x1 and x2 contain now (2;3)
A graph is automatically tagged as plotn if no tag is specified (iplotn for the plots generated by iplot commands). n is automatically set by Nutmeg and is unique for a plot in a SpiceOpus session. The plot tag is displayed in the title bar of the graph as tag: graph_name To create and tag a graph, use plot create tag vectors:
* Create a graph, tag it plota and display
* vectors a and b vs default scale
plot create plota a b
In case a graph with the given tag exists, the new graph is tagged with it. This makes it impossible to refer to the older graph. To append some more data to a graph, use plot append tag vectors:
* Appends vector c to graph tagged plota
plot append plota c
To append without autoscaling and repainting the graph, use plot quickappend tag vectors:
* Quickappends vector c to graph tagged plota
plot quickappend plota c
After the last quickappend call autoscale on the updated graph by typing plot autoscale tag:
* Autoscales graph tagged plota
plot autoscale plota
In case there are scaling and graph type commands in the plot append clause, they are applied to the graph. If the graph doesn't exist (the user has closed it), the graph is recreated and tagged with the given tag. A graph can be closed with plot destroy tag:
* Close graph plota
plot destroy plota
Nutmeg function floor() returns an integer vector with largest components not exceeding the components of the operand. ceil() returns an integer vector with smallest components not below components of the operand. round() rounds the vector components to the nearest integer. In case the operand is complex, these functions operate on real and imaginary parts independently.
Vector operator [%index] returns an element with the corresponding index from the vector if the index is integer. If the index is real, linear interpolation is used to calculate the return value. Example:
setplot new
nameplot plot10
let a=(2;4;5;9)
let b=(1;2;3;4)
* x1 becomes 4
let x1=a[%1]
* x2 becomes 2.5 (in the middle between components
* b[1] (2) and b[2] (3))
let x2=b[%1.5]
Nutmeg command cursor manipulates cursors. A cursor is a vector of length one (vector component) that represents a real index into a vector. To initialize a cursor, create a vector:
* Creates two cursors, cleft and cright
let cleft=0
let cright=0
To move a cursor to the left edge of a vector, use:
* Moves cleft to the left edge and cright to the right edge of vector 'time'
cursor cleft left time
cursor cright right time
To move a cursor to a certain level on a vector, use:
* Moves cleft towards right until it reaches level 0.5 on vector pulse
cursor cleft right pulse 0.5
* Moves cright towards left until it reaches level 0.5 on vector pulse
cursor cright left pulse 0.5
Cursors are real indices into vectors. Since time is the scale for vector pulse, the time difference between cleft and cright is the pulse width (if vector pulse contains only one pulse with bottom level zero and top level one). Pulse width can be obtained by:
* See explanation of the [%index] vector operator
let pulsewidth=time[%cright]-time[%cleft]
To put it in short: the syntax for the cursor command is:
* Initialize a cursor
cursor vec_el left|right
* Move a cursor
cursor vec_el left|right vector_expression level_expression
The cursor position is stored in vec_el (either a real vector of length one or a real vector element of the form vector_name[element_index]). The following example measures the rise time of a signal named pulse using time for scale:
* Create scalar c1 and c2 (cursors)
let c1=0
let c2=0
* Get the bottom and the top level of the pulse
let bottom=min(pulse)
let top=max(pulse)
* Move c1 and c2 to the left edge of vector pulse
cursor c1 left pulse
cursor c2 left pulse
* Move c1 to 10% level between bottom and top
cursor c1 right pulse bottom+0.1*(top-bottom)
* Move c2 to 90% level between bottom and top
cursor c2 right pulse bottom+0.9*(top-bottom)
* Calculate difference between c1 and c2 using time for scale
let trise=time[%c2]-time[%c1]
* Display result
echo Rise time {trise}
One can specify at which crossing of the signal the cursor should stop.
* This will stop at 4th crossing of 0.5 in v(10) when moving towards right
cursor c right v(10) 0.5 4
Finally only crossings of patricular type can be counted.
* This considers only crossings where v(10) is rising
cursor c right v(10) 0.5 4 rising
* This considers only crossings where v(10) is falling
cursor c right v(10) 0.5 4 falling
* This considers all crossings
cursor c right v(10) 0.5 4 any
If the number of intercepts is left out, it is assumed to be one. If the type of crossing is left out all crossings are cosidered (just like with any).
Transient waveforms for independent voltage and current sources can be changed.
For the purpouse of the explanation consider the following netlist:
Transient source netlist
v1 1 0 dc 0 pulse 0 1V 1ms 1us 1us 2ms 4ms
r1 1 0 1
To change the pulse width for v1 from 2ms to 3ms, type:
let @v1[coeffs][5]=3m
* This would also do the trick. Note that the following
* assignment changes the type of the source to PULSE no matter
* what the current type is whereas the previous assignment (using
* the coeffs parameter) changes only the 6th parameter to 3m no
* matter what type of transient source is currently set for v1.
let @v1[pulse][5]=3m
To change the transient waveform for v1 from pulse to sin with parameters 0 1 1kHz, type:
let @v1[sine][5]=(0;1;1k)
* or
let @v1[sin][5]=(0;1;1k)
The same goes for the independent current sources.
First iteration voltages for finding dc or initial transient solution can be set by nodeset command.
Similarly the initial conditions for transient analysis can be set by ic command. Both commands have the same syntax:
nodeset [delete | <plot_name> |
v(<node_name_1>) = [value_1] [v(<node_name_2>) = [value_2]
[v(<node_name_3>) = [<value_3>] ... ]]]
and
ic [delete | <plot_name> |
v(<node_name_1>) = [value_1] [v(<node_name_2>) = [value_2]
[v(<node_name_3>) = [<value_3>] ... ]]]
Examples
Without any arguments commands nodeset and ic list defined nodesets or initial conditions, respectively.
nodeset
Nodesets:
v(1) = 1.000000e+001
v(3:x1) = 5.000000e-001
or
ic
Initial conditions:
v(2) = 3.000000e+000
v(6:x1) = 1.000000e-001
If one wants to delete nodeset for node 1 (or initial condition for node 6:x1), and at the same time set additional nodeset for node 4 to 3V (or initial condition for node 7:x2 to 2V), then one has to issue:
nodeset v(1)= v(4)=3V
or
ic v(6:x1)= v(7:x2)=2V
All nodeset voltages (or initial conditions) can be set to an arbitrary analysis results. Commands:
nodeset op1
and
ic tran3
set all nodeset voltages to values of vectors in op1 plot (results of operating point analysis) and all initial conditions to final values of vectors in tran3 plot (results of transient analysis). All nodeset or initial conditions can be removed by:
nodeset delete
or
ic delete
commands respectively.
Arithmetic substitution enables you to replace the expression in the curly braces by its value prior to the execution of the Nutmeg command. All valid nutmeg functions and operators may be used in the expression. Avoid spaces. Expansion rules depend on the type of the result (real, complex, scalar, vector) The expansion rules are as follows
{expression} -> result
real scalar -> value
complex scalar -> (rvalue,ivalue)
real vector -> (value1;value2;...)
complex vector -> ((rvalue1,ivalue1);(rvalue2,ivalue2);...)
Example: set the voltage source DC parameter for sources V1, V2, ..., V20 to 0.
let counter=1
while counter le 20
let @v{counter}[dc]=0
let counter=counter+1
endwhile
Function integrate() calculates new vector which is defined integral of the argument on its scale. For instance if v(3) is a time depended voltage (its scale is time), then vector integ_v3 obtained by integ_v3 = integrate(v(3)) represents:
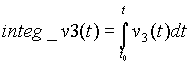
Before the integration takes place the original vector is approximated by a polynomial. The degree of polynomial approximation can be set with polydegree variable.
Parametrised subcircuit parsing.
By default parameterised subcircuits are reparsed every time an arbitrary subcircuit parameter is changed. This is not convenient in cases when one wants to change more subcircuit parameters one after another. In this case the subcircuit shall be parsed after every parameter change instead only at the end. To avoid such situations (which typically arise in optimisation loops) manual subcircuit reparsing can be invoked by setting manualscktreparse variable. If the variable is set then subcircuit is reparsed only when required by scktreparse command. The syntax of the command is:
scktreparse [<sckt_name_1> <sckt_name_2> ...] [<@sckt_mod_name_1> <@sckt_mod_name_2> ...]
Function area() will return total area of the specified circuit in future. At the moment only MOSFET devices are taken into account. Therefore currently area occupied by MOSFETs is returned. The function takes one argument which represents circuit number. The circuit number can be obtained by setcirc command. If circuit number is zero then area of current circuit is calculated.
SpiceOpus names items in subcircuits from bottom to top.
SpiceOpus names items in subcircuits from bottom to top (e.g. node1:sckt1:sckt2). That is different from some other Spices which use top to bottom naming (e.g. sckt2:sckt1:node1). This fact is noted in the header of the output raw file by line Sckt. naming: from bottom to top.
All current subcircuit parameter values can be saved or restored by scktparams command. A parameterset (set of subcircuit parameters) is saved by get and restored by set subcommand. A particular parameterset can be printed by print subcommand or removed by remove subcommand. If parameterset_name is not given with print or remove subcommands then list of available parametersets is printed or all parametersets of the subcircuit are removed, respectively. The syntax of the command is:
scktparams <sckt_name|@sckt_mod_name> get|set|print|remove [parameterset_name]
To push a reference to a plot onto the plot stack, use pushplot Plots pushed onto the stack cannot be destroyed. They must be popped first.
destroy all clears the plot stack and deletes all plots with the exception of the constants plot (const).
To display the contents of the plot stack, use plotstack.
Command script implements procedures in Nutmeg.
The syntax is:
script argument [script_name [command_line]]
The second item, argument, can be add, delete, list or run.
- add adds new line (Nutmeg command) to the script (procedure). It needs script_name and command_line arguments. Lines are always added at the end, after the last one.
- delete without script_name deletes all scripts. If script_name is specified then only that script is deleted. command_line argument is not needed.
- list without script_name lists names of currently available scripts. If script_name is specified then commands in that script are listed. command_line argument is not needed.
- run executes commands in specified script. It needs script_name argument.
Command test will be used for obtaining various file properties (size, date of creation and modification etc.) in future. At this moment only checking of file existence can be performed. The syntax of the command is:
test exist <filename> <vectorname>
The command creates new vector in the current plot. Is value is one if file exists and zero otherwise.
Command netlist will be used for obtaining various netlist information in future. At this moment only extracting models and instances from the netlist can be performed. The syntax of the command is:
netlist list (model <model_type> | instance <model_name>) <var> <scalar>
Available model_types are listed here. If the third field is model then the result is list of defined models of specified type. Otherwise (the third field is instance) the result is list of instances of specified model. List of model/instance names is stored into global variable var, while its length is written into scalar, which is member of current plot.
Nutmeg variables rndinit, gausstruncate and functions rndunif (x), rndgauss (x).
Nutmeg variables rndinit, gausstruncate and functions rndunif (x), rndgauss (x) were implemented to handle random real numbers. The argument of both functions is complex vector x. For rndunif (x) function argument is x = ((delta1, mean1); (delta2, mean2); ...), and for rndgauss (x) function argument is x = ((sigma1, mean1); (sigma2, mean2); ...). If argument x is real vector then all meanx values are zero by default. Both functions return real vector of real random values. i-th component of vector returned by rndunif() function is uniformly distributed real random number on open interval (meani - deltai, meani + deltai). And on the other hand i-th component of vector returned by rndgauss() function is normally distributed real random number with standard deviation sigmai and mean value meani.
Nutmeg variable rndinit resets random generator. It has to be a negative integer, which is used as seed. Its default value is -1. Variable gausstruncate sets so-called gauss truncation. i-th component returned by rndgauss() function is always inside open interval (meani - gausstruncate * sigmai, meani + gausstruncate * sigmai). If that is not the case then obtained random number is skipped and another is generated. The default value of gausstruncate variable is 1e300, which in practice means no truncation.
Steady state response analysis in transient domain is available by ssse command. The shooting method with extrapolation is used. Syntax of ssse analysis is as follows:
ssse v( Above v( The analysis is performed by a sequence of transient analyses. New initial conditions are calculated after
each transient run and are used in the next. This goes on until convergence (steady state response) is reached
or we run out of maximum number of transient iterations. The iteration limit is given by itl2 option. Convergence
is defined with absolute and relative tolerances given by products of sssetol* vntol or sssetol* abstol and
sssetol* reltol options. The convergence is reached when the difference between right hand side values at the
beginning and right hand side values at the end of the last period is inside tolerances.
By default only the last transient run results (steady state response) are saved in plot as final results
of ssse analysis. If history flag is set then all transient iterations performed during the steady state
analysis are saved into subsequent plots.
Note: It turned out that steady state analysis in transient domain by shooting with extrapolation is in
some cases numerically unstable. If that happens reducing timestep or changing integration method, order
and transient oscillation detection sometimes help.
<> ... user defined value
[] ... optional field
Syntax $var_name is obsolete. To reach the variable use $(var_name) instead.
* Print value of 'aaa' variable
echo aaa = $(aaa)
aaa = value_of_aaa
To check if the variable exists use $(?var_name). If the variable exists one is returned, otherwise zero.
* Create 'aaa' variable
set aaa = value
* Variable 'aaa' exists, therefore one dimensional vector ccc is one
let ccc = $(?aaa)
* Variable 'bbb' does not exist, therefore one dimensional vector ddd is zero
let ddd = $(?bbb)
Variable can have more than one component. To find out how many components the variable has use $(#var_name) syntax. Number of components is returned.
* Create an ordinary variable 'aaa' and variable 'bbb' with four components
set aaa = valuea
set bbb = ( valueb1 valueb2 valueb3 valueb4 )
* Variable 'aaa' has one component, therefore one dimensional vector ccc is one
let ccc = $(#aaa)
* Variable 'bbb' has four components, therefore one dimensional vector ddd is four
let ddd = $(#bbb)
To get only one component of the variable use $(var_name[index]) syntax. index is zero based. If index exceeds number of components then empty space is returned.
* Create variable 'aaa' with four components
set aaa = ( value1 value2 value3 value4 )
* Print non-existing fifth component of 'aaa' variable
echo aaa[4] = $(aaa[4])
aaa[4] =
* Print fourth component of 'aaa' variable
echo aaa[3] = $(aaa[3])
aaa[3] = value4
SpiceOpus prompts for a value, string, piece of Nutmeg code without ({}, $, aliases etc.) substitutions etc. when $(-) syntax is used.
* Prompt the user to enter the value of 'aaa' vector
let aaa = $(-)
(1; 2; 3)
* 'aaa' is now three dimensional vector
This variable sets the tolerance for the unwrap() NUTMEG function. If it is not set the defailt value of 5 is used. unwrap() treats any phase jump in excess of (1-unwraptol/100)x360 degrees as a phase wraparound and corrects the phase correspondingly. Use unwraptol values above 50 for postprocessing of simulation results obtained from circuits comprising long transmission lines or any other element that causes the phase to vary rapidly with frequency.