So after all the fun and excitement with development or research it's time to present results to the public. And for many including us this is usually starting point for mostly boring and sometimes frustrating work. Pictures never seem to be in the right format, they have poor resolution, fonts are ugly or word processor simply crashes when importing them, etc... So here are two examples which show you how we have solved this problems.
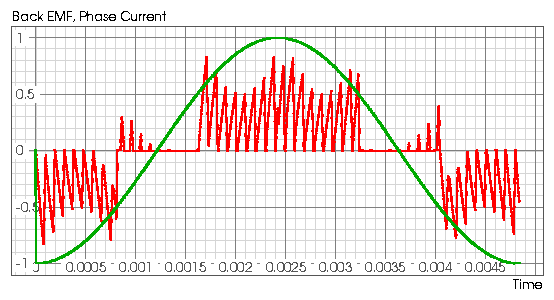
In the first example you can see a picture in PNG format which was automatically generated from
Spice Opus plot window. We set things in such a way that you get a picture of the same size which
is configurable through the init file.

Example of automatically generated picture in PNG format from Spice Opus Plot Window
Second example is in PDF format so you need Adobe Acrobat Reader or Ghostscript to see Example of Spice Opus Plot Window in PDF format. In this case picture was automatically generated in PDF format and included in MIKTEX document. You can find more about MIKTEX on MIKTEX home page.
If you like the results proceed to the following sections where you will find all necessary information how to do it yourself on your platform without much hassle. Since the actual conversion is done by Ghostscript it is also possible to generate pictures in other graphic formats suitable for inclusion in almost any word processor (MS Word, Wordperfect...). Also this approach is not limited to the Spice Opus, but you can use it with any other program.
Generating Pictures of Plot Window
Procedure to generate pictures is quite the same on Windows and Linux so the following explanation covers both operating systems. Details about about required software, installation, configuration, troubleshooting and other platform dependent specifics are explained in the dedicated sections. For those who want to change or to improve something there are additional information in Soexp Utility.
Procedure to generate picture of plot window goes like this:
- Set the desired conversion options by editing soexp_ini. You will find all necessary information about options and syntax well documented in the file itself. Because init file is always called from command line you can have many different versions of it for specific tasks.
- Print the Spice Opus Plot Window in file. Here you can choose dimensions of picture and printing of Title and Time Stamp.
- Run the Soexp. To alter some options set in init file on per case basis you can specify them on the command line. This way many but not all conversion options can be changed.
If everything has gone well you now have the picture in desired format. On Windows platform it is possible to merge step 2 and 3 and automate this procedure further (Linux to follow). In this case all settings on per case basis could be done only through the init file.
Linux Specifics
- The first program you need is the Soexp which is supplied with the Spice Opus or you can download latest version from here.
- The Ghostscript (GS) - should be at least version 6.0 or newer!!! - is the only required program besides the Soexp. In year 2005 every GNU/Linux distribution includes at least version 7 of GS, so there is no need for separate download from GS home page. Simply install GS with your preferred package management tool and that's all.
- To use GS as postscript and pdf viewer it is nice to have some kind of front end to it. On Linux there are plenty of such front ends: GV, Ghostview, KGhostview,etc.. They are standard part of all distributions and you can bet that at least one of them is already present on your system.
- For viewing pdf documents on Linux platform my choice is xpdf. But it is always good practice to test final result with a program used by majority of people. So you can get free (as beer) Acrobat Reader from Adobe.
Since we at our place use only Debian GNU/Linux (Sid and Sarge) and derivatives (MEPIS) all installation specifics are dedicated to this distribution. At time of this writing Debian distributes tree different versions of gs: gs-gpl, gs-afpl, gs-esp and all of them works with soexp.
- Install the Soexp:
prompt:$ cd /usr/local/src
prompt:$ tar -xvzf soexp.tar.gz
prompt:$ gcc -Wall -o soexp soexp.c (only if you want to compile soexp by yourself!)
prompt:# mv soexp /usr/local/bin (as root!!) - As a root install one or more versions of the GS (omit unnecessary):
prompt:# apt-get install gs-gpl gs-afpl gs-esp
- And if you install more than one version of GS choose one to use through Debian system
of alternatives:
prompt:# update-alternatives --config gs(as root!!)
And that's all. If everything went smoothly you should have working system. You can verify it by running ghostscript (gs) or any of mentioned front ends to it.
Windows Specifics
At the beginning of this section I must inform you, that on the Windows platform we use only Windows 98/XP and all tests we performed were on this two versions of the Windows. There is no reason why the whole procedure shouldn't work on other versions of Windows too, but we didn't test this.
- The first program you need is the Soexp which is supplied with the Spice Opus or you can download latest version from here.
- Ghostscript - should be version 6.0 or newer!!! - is the only obligatory program besides the Soexp. You can get it from GS home page. From the same site you can also get the next two very useful utilities.
- The first one is Redmon which redirects printer output to other programs (in our case to the Soexp) and thus makes possible to generate picture as simply as printing it to the printer. Because Redmon comes as zipped archive you also need WinZip or similar utility to install it.
- The second one is GSview. It is a front end to Ghostscript and greatly simplify its use. This one is not obligatory but it's handy if something goes wrong or you have decided to extend functionality of the Soexp. In both cases please send us your results back so we could share them with other users.
Install the Soexp, just extract contents of archive into desired folder.
The next program to install is Ghostscript. If you have decided to install GSview do it after Ghostscript. Installation of both is very easy and straightforward process. Both come in single executable file. Just run them and leave all options on their default values.
If it is good enough for you that every time you want to generate a picture you have to execute Soexp from the command prompt within the DOS window you can safely skip this step and proceed with the installation of printer driver. Otherwise create folder c:\redmon and extract content of Redmon archive into it. We will also use program Redrun which is part of Redmon. If you are using Windows NT you should read readme.txt which comes with Redmon. Now you just run setup.exe and you are done with installation. If you have decided not to install Redmon into c:\redmon just be careful to use your own installation path instead of this one later.
The last step is to install and configure Postscript printer driver. Any Postscript printer driver should work as long it's set properly. We use driver for Apple LaserWriter II NT, the one suggested in GSview documentation. According to this documentation it is preferred one because it supports only basic postscript functions, so there shouldn't be any problems with compatibility. All tests we did were done with this printer driver. If you have decided to use any other printer and something doesn't work as expected, first try to use this one. Because right printer settings are crucial for the success of operation here are those which should be changed from their default values:
Fonts tab
Always use built-in printer fonts instead of TrueType fonts
PostScript tab
Postscript output format: Encapsulated PostScript (EPS)
Postscript header: Assume header is downloaded and retained
If you have chosen not to use Redmon installation is finished otherwise proceed with Redmon configuration.
- Details tab - Add Port
- Add Port - Other - Redirected Port
- Add Redirected Port - OK
- Details tab - Spool Settings...
- Spool Settings - Disable bi-directional support for this printer.
- Details tab - Port Settings...
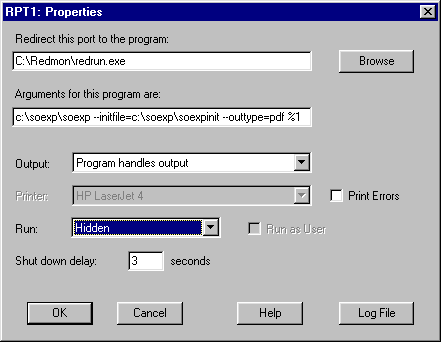
- Because there are many settings here is a picture of them:
 <
<
Short description of the first two settings may be valuable if you decide to change something. Program redrun.exe which appears in "Redirect this port to the program:" is a part of Redmon. Its function is to save printer output into the file with a random name and runs program in "Arguments for this program are:". In our case this is the Soexp and all its command line. If the path to the Soexp is not set in a PATH variable (autoexec.bat) should be included here. "%1" is the name of Soexp input file. If you have not specified ž output file on soexp command line under the Port Settings you will get output file with random name in c:\windows\temp directory.
If you need to generate pictures in different formats frequently the best way is to set up more then one printer and redirected port. You just repeat steps above and specify different printer name and command line options for the Soexp (for example: --outtype=png).